How to Disable IPv6 on Windows 11 (2 Ways)
By default, both Windows 11 and Windows 10 use IPv6 and IPv4 protocols in their dual-stack configuration. IPv6 (Internet Protocol version 6) is the successor to IPv4 in Windows 11 and offers many advantages, such as larger address space, security improvements, and better support for multicast transmissions. However, sometimes IPv6 creates problems on Windows 11-running laptops and computers. In this article, I have shared how to disable IPv6 on Windows 11.
IPv6 is enabled by default in Windows 11. However, sometimes IPv6 interferes while setting third-party networks in Windows 11. In such a situation, users want to turn off IPv6 on their Windows 11-running laptop or PC. Did you know that you can fix the “PC Game Pass games not syncing or installing” problem by disabling IPv6 in Windows 11?
How to Disable IPv6 on Windows 11
Microsoft provides its users with various ways to turn off IPv6 in Windows 11.
#1. Disable IPv6 from Control Panel on Windows 11
To turn off IPv6 in Windows 11, you can use the Control Panel. Microsoft provides a Control Panel in its Windows OS, in which you get many features that you can use to enable or disable options.
To turn off IPv6 using Control panel:
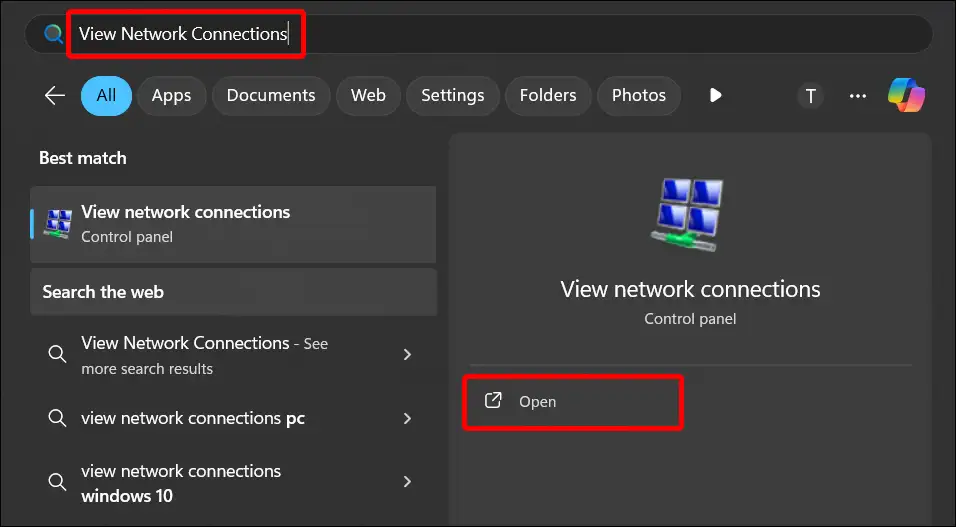
1. Press the Windows Key on Keyboard and Search for “View Network Connections” and Open It.
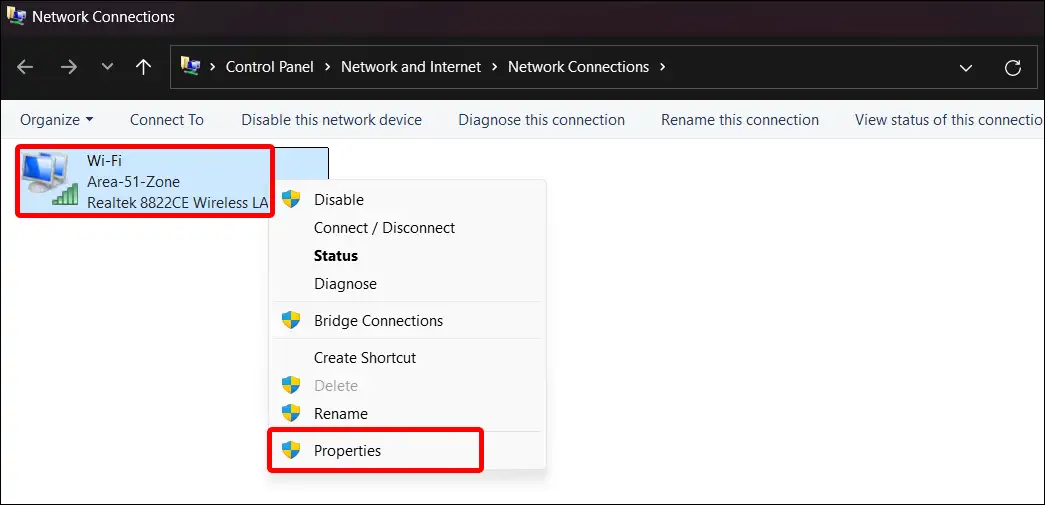
2. Find Your Network Adapter and Right Click on It. Then Click on Properties.
3. A Pop-up Tab will Appear on Screen, Find the “Internet Protocol Version 6 (TCP/IPv6)” from the List and Uncheck It.
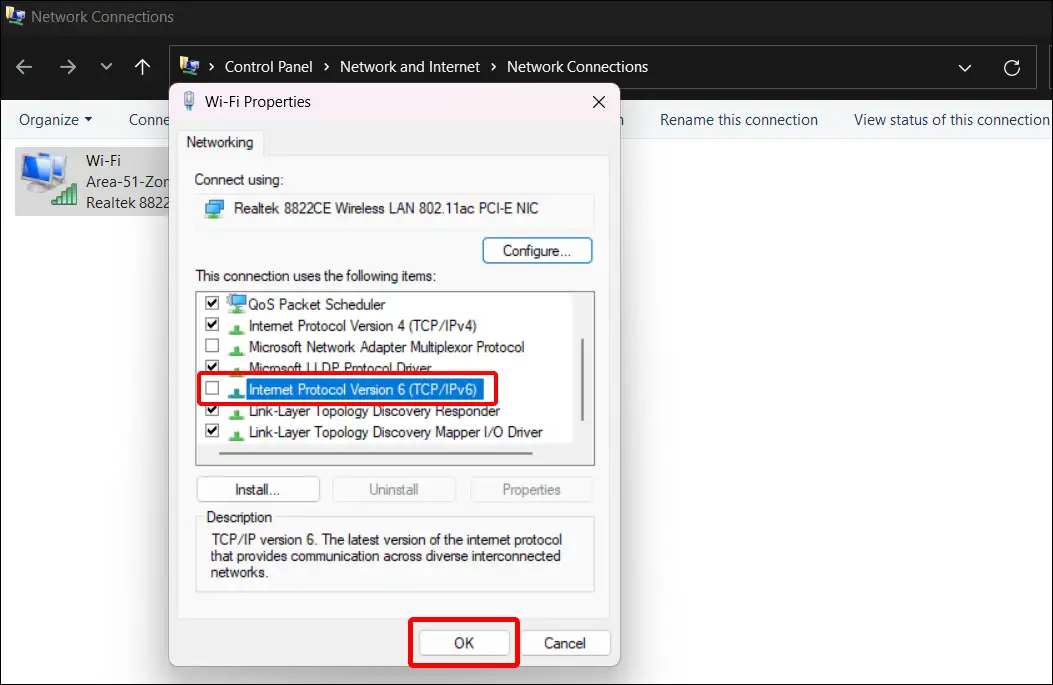
4. Next Tap on OK then Close It.
Also read: How to Enable or Disable Battery Saver Mode on Windows 11
#2. Turn Off IPv6 on using Command Prompt in Windows 11
Command Prompt is a text-based interface where you can enter command lines to perform various tasks such as file management, system configuration, network diagnostics, and more. And you can also disable IPv6 in Windows 11 using this CMD. For this, follow the steps given below.
Friendly warning: If you do not follow the steps given below correctly, your installation may get damaged. It would be better if you created a backup before editing the registry.
To turn off IPv6 using commands:
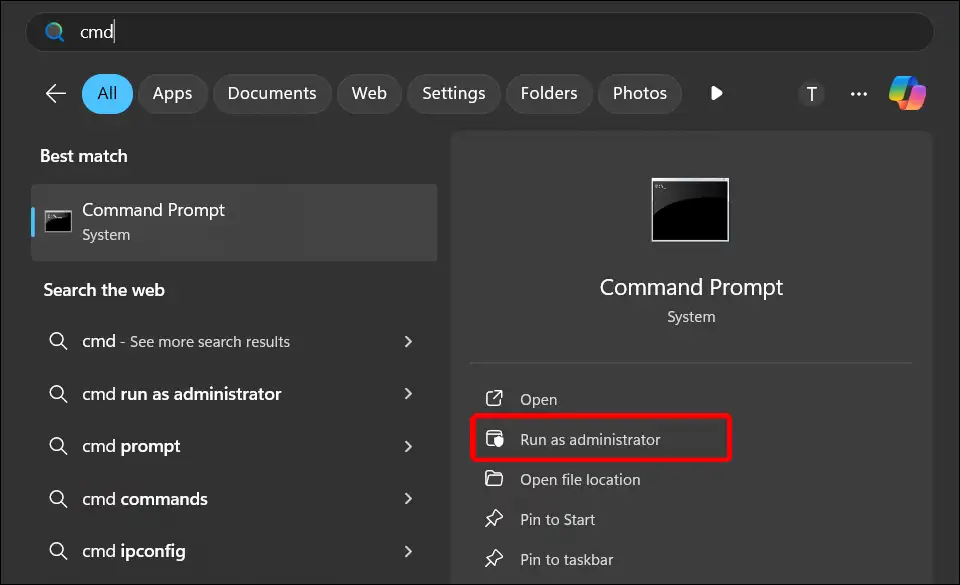
1. Press Windows Key on the Keyboard and Search “cmd”.
2. Now Tap on Run as administrator at Right-Side Panel to Open Command Prompt as Administrator.
3. Now Enter the Following Command Line and Hit Enter on Keyboard.
reg add “HKEY_LOCAL_MACHINE\SYSTEM\CurrentControlSet\Services\Tcpip6\Parameters” /v DisabledComponents /t REG_DWORD /d 255 /f
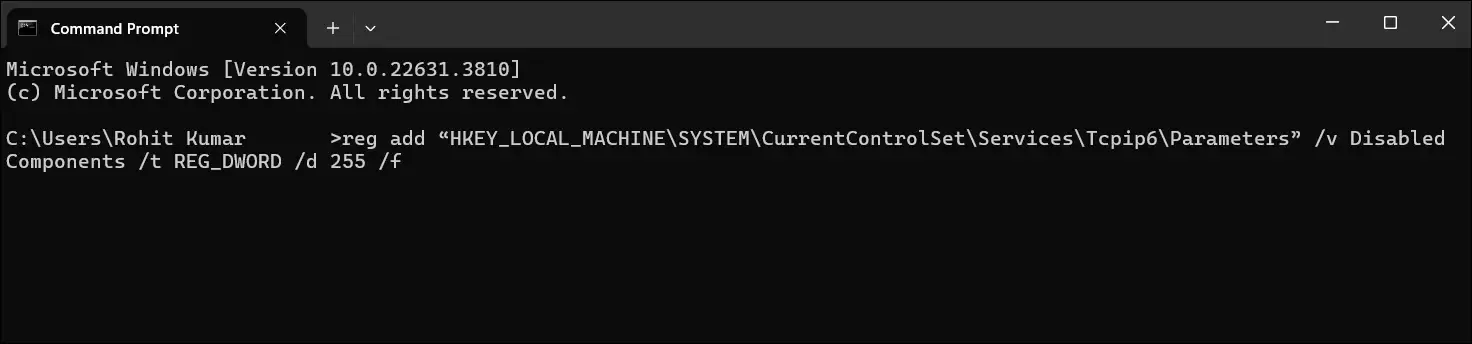
4. Now a Message “The operation completed successfully” will Display on Screen.
5. If You Want to Re-enable IPv6 on Windows 11, Then Enter Following Command Line and Press Enter Key on Keyboard.
reg delete “HKEY_LOCAL_MACHINE\SYSTEM\CurrentControlSet\Services\Tcpip6\Parameters” /v DisabledComponents /f
6. Now Close the Command Prompt and Restart Your Laptop on Computer.
That’s it! your work is done. IPv6 has been successfully disabled on your Windows 11 PC.
You may also like:
- How to Turn On or Off Online Speech Recognition on Windows 11
- How to Enable or Disable Developer Mode on Windows 11
- How to Enable or Disable Recall on Windows 11
- How to Disable Snipping Tool on Windows 11
I hope you have found this article very helpful. And after reading this article, you learned how to disable IPv6 on Windows 11. If you are facing any kind of problem while turning off IPv6, then let us know by commenting below. Please share this post.


Just implement IPv6 correctly, then you don’t need to deactivate it.